

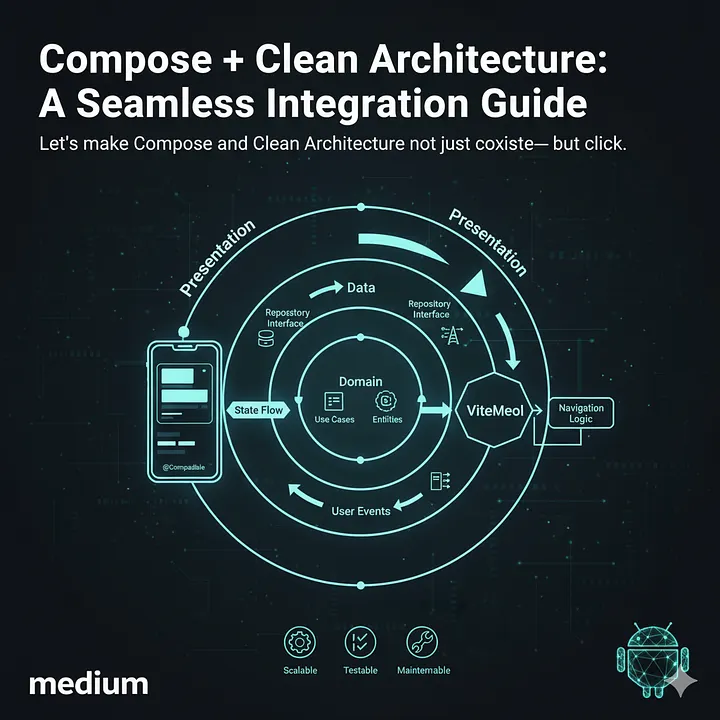
Compose + Clean Architecture: A Seamless Integration Guide
“I get the theory — but how does it all fit together in a real app?”
That’s the question I hear the most when mentoring Android developers.
We all understand Clean Architecture; we all love Jetpack Compose, but when it’s time to actually combine them… things start to get messy.
Do I inject a Repository into my Composable?
Should my ViewModel call use cases or repositories?
Where does navigation logic go?
If you’ve ever asked those, this article is for you.
Let’s make Compose and Clean Architecture not just coexist — but click.
First, Let’s Align on What Clean Architecture Means
Clean Architecture isn’t about layers for the sake of layers.
It’s about boundaries.
It says:
Your core logic should not care how the UI looks, how the network works, or where data comes from.
Think of it as circles of trust:
- The Domain layer is the innermost — pure Kotlin, no Android.
- The Data layer sits around it — implements repositories and APIs.
- The Presentation layer (Compose UI + ViewModel) is the outer layer that talks to users.
That separation keeps your app scalable, testable, and clean — even after years of feature creep.
The Big Picture: Layers Overview
Here’s the structure we’ll build:
:domain
  ├── model/
  ├── usecase/
  └── repository/
:data
  ├── remote/
  ├── local/
  └── repository/
:feature:posts
  ├── ui/
  └── presentation/
The domain layer defines what the app does.
The data layer defines how it gets done.
The feature layer defines how it looks.
Step 1 — Define the Domain Layer
Keep this layer pure Kotlin — no Android dependencies.
Domain model:
data class Post(val id: String, val title: String, val body: String)
Repository contract:
interface PostRepository {
    suspend fun getPosts(): List<Post>
}
Use case:
class GetPostsUseCase(private val repo: PostRepository) {
    suspend operator fun invoke(): List<Post> = repo.getPosts()
}- No Retrofit.
- No Room.
- Just pure business logic.
This is your app’s “truth.” Everything else revolves around this.
Step 2 — Implement the Data Layer
Now we connect the outside world (network, cache, etc.) to your domain.
Remote DTOs:
data class PostDto(val id: String, val title: String, val body: String)API service:
interface ApiService {
    @GET("posts")
    suspend fun getPosts(): List<PostDto>
}
Mapper:
fun PostDto.toDomain() = Post(id, title, body)Repository implementation:
class PostRepositoryImpl(
    private val api: ApiService
) : PostRepository {
    override suspend fun getPosts(): List<Post> = api.getPosts().map { it.toDomain() }
}- Implements the domain interface.
- Keeps the domain free from Retrofit.
- Easy to swap out later (mock data, Room, etc.).
Step 3 — Build the ViewModel (The Bridge)
Your ViewModel sits between the domain and UI.
It calls use cases, holds UI state, and exposes it as Flow or StateFlow.
data class PostsUiState(
    val loading: Boolean = false,
    val posts: List<Post> = emptyList(),
    val error: String? = null
)
ViewModel:
@HiltViewModel
class PostsViewModel @Inject constructor(
    private val getPosts: GetPostsUseCase
) : ViewModel() {
private val _uiState = MutableStateFlow(PostsUiState())
val uiState = _uiState.asStateFlow() fun loadPosts() = viewModelScope.launch {
_uiState.update { it.copy(loading = true, error = null) } runCatching { getPosts() }
.onSuccess { posts ->
_uiState.update { it.copy(loading = false, posts = posts) }
}
.onFailure { e ->
_uiState.update { it.copy(loading = false, error = e.message) }
}
}
}
- ViewModel depends only on the use case, not Retrofit or DAO.
- State-driven, reactive, and fully testable.
Step 4 — Compose the UI
Now we plug it all together with a simple, reactive UI.
@Composable
fun PostsScreen(vm: PostsViewModel = hiltViewModel()) {
    val state by vm.uiState.collectAsStateWithLifecycle()
LaunchedEffect(Unit) {
vm.loadPosts()
} when {
state.loading -> LoadingView()
state.error != null -> ErrorView(state.error)
else -> PostList(state.posts)
}
}List composable:
@Composable
fun PostList(posts: List<Post>) {
    LazyColumn {
        items(posts) { post ->
            Text(
                text = post.title,
                style = MaterialTheme.typography.titleMedium,
                modifier = Modifier.padding(16.dp)
            )
        }
    }
}
This is what makes Compose shine:
The UI just reacts to state changes.
No more manual updates, no more findViewById chaos.
Step 5 — Add a Fake Repository for Previews
One of Compose’s most underrated features is how easily you can preview screens with fake data.
@Preview
@Composable
fun PreviewPostsScreen() {
    val fakeRepo = object : PostRepository {
        override suspend fun getPosts() = listOf(
            Post("1", "Compose + Clean Architecture", "Bringing structure to declarative UI"),
            Post("2", "MVI Patterns", "Managing state like a pro")
        )
    }
    val vm = PostsViewModel(GetPostsUseCase(fakeRepo))
    PostsScreen(vm)
}- Fast previews, no network calls.
- Perfect for design reviews and theme testing.
Step 6 — Module Structure for Real Apps
When your app grows, split your code into Gradle modules:
:app
:core:ui
:core:domain
:data:network
:data:repository
:feature:posts
Each module should know as little as possible:
:featuredepends only on:domain:datadepends on:domain:appties everything together
This keeps building fast and clean — and makes refactoring painless.
Step 7 — Hilt Setup
Your dependency graph ties everything together:
@Module
@InstallIn(SingletonComponent::class)
object AppModule {
    @Provides
    fun provideApi(): ApiService = Retrofit.Builder()
        .baseUrl("https://jsonplaceholder.typicode.com/")
        .addConverterFactory(GsonConverterFactory.create())
        .build()
        .create(ApiService::class.java)    @Provides
    fun provideRepo(api: ApiService): PostRepository = PostRepositoryImpl(api)    @Provides
    fun provideUseCase(repo: PostRepository) = GetPostsUseCase(repo)
}
And you’re done — full DI, no manual wiring.
Real-World Benefits
After refactoring two enterprise projects this way, here’s what I saw firsthand:
- 30% faster build times — thanks to modularization
- Simpler debugging — because data flow is linear
- Safer refactors — each layer is testable
- Reusability — use cases and repositories reused across apps
Compose + Clean Architecture just feels right.
It’s expressive at the UI level and disciplined underneath.
Wrapping Up
Compose doesn’t replace architecture — it rewards good architecture.
When you combine it with Clean Architecture:
- Your UI becomes predictable
- Your data flow becomes traceable
- Your team becomes unstoppable
This pattern scales from side projects to multi-module enterprise apps.
And it’s exactly what Google’s best practice materials (and GDEs 😉) promote today.
TL;DR
- Keep your domain layer pure Kotlin.
- Let your data layer implement repositories.
- Use use cases as boundaries between data and UI.
- Make your ViewModels reactive with StateFlow.
- Build Compose UIs that read from state, not mutable data.
Author’s Note
If this guide helped you connect the dots, follow me — the next article builds directly on this.
Let’s keep modernizing Android development together — one clean layer at a time.